Tuesday, November 20, 2012

CrockPot New England Clam Chowder


CrockPot New England Clam Chowder

Ingredients
6-8 Medium Potatoes, peeled and cubed
4 cans of minced clams in clam juice
3 cups chicken stock
1 cup water
1 large yellow onion, finely chopped
1/2 pound bacon, diced
1 cup heavy whipping cream
2 tbsp. butter
3 tbsp. flour
2 tsp garlic powder
2 tsp Old Bay Seasoning 
2 Bay leaves
Fresh cracked pepper
*Old Bay Seasoning has salt in it so there is no need for additional salt unless you like it really salty!*

 Brown bacon in pan, when crisp, add 2 tbsp butter and melt
 After butter has melted add chopped onions and bay leaves.
Cook till onions are soft and translucent but do not brown. 
 Add 3 tbsp flour and stir thoroughly to make a roux base.
 Add to CrockPot in order:
cubed potatoes
water
chicken broth
onion roux mixture
clam juice from all 4 cans of clams
seasoning
 Put clam meat in a container and refrigerate for later.
 Your concoction should look like milky water. Cook on low for 4 hours.
 After 4 hours, turn the CrockPot off and let the stew cool at room temp so the flavors can "marry" together.
Below is what it will look like after it has cooled. Now is the time to take your ladle and skim off the extra fat and oil that has surfaced to ensure a creamy soup. (I forgot this step but it still turned out delish. :o) 
Add the 2 cups of heavy whipping cream and the minced clam meat. 
Cook on low for one more hour and then it is ready to serve! Enjoy! 


Thursday, November 15, 2012

Crocheted Leg Warmers

Leg Warmers!!!


I've finally finished crocheting my leg warmers. I was winging this one so I don't have a pattern written yet. I will try to write it up and post it tomorrow. I think I like them. Despite the lacy texture, they are quite warm. They have some stretch so I can pull them up around my calves for higher boots as well. They look really cute with flats too. Yay! They also work up fairly quickly if you can sit and crochet uninterrupted. :o)
Follow Me on Pinterest

Tuesday, November 13, 2012

CrockPot Chicken Tortilla Soup

Chicken Tortilla Soup in the CrockPot

I LOVE my CrockPot. If it can be made in a CrockPot, I will try it, at least once. Well this little beauty above is a repeat. One of my fave's to say the least. Once you try this super easy recipe it will probably be on your favorites list as well. I always get requests for the recipe, so here it is!

Ingredients


  • 6 Boneless skinless chicken breasts (uncooked, uncut - Yay!)
  • 1 C. Water
  • 2 C. Chicken Broth
  • 1 Tbsp Chili Powder
  • 2 tsp Cumin
  • 1 Tbsp Lawry's Seasoning Salt
  • 1 - 10oz can of red enchilada sauce
  • 1 - 10oz can of Ro-Tel Original Diced Tomatoes & Green Chilies
  • 1 - 14oz can of black beans (or whatever beans you like)
  • 1 C. frozen corn
  • 1 large sweet yellow onion (chopped- boo)
  • 6 cloves garlic (minced- darn)
  • 1/4 C. Mezzetta Roasted Bell Peppers (chopped-agh!) - Optional
  • 1/2 C. Heavy Whipping Cream - Optional as well
  • 6 Corn tortillas ripped into pieces
Directions
Turn your CrockPot on High. Pour in the olive oil and spread around when it gets warm. Put the diced onion and garlic in the bottom and sprinkle with a little salt. Place the raw chicken breasts on top of the onion and garlic. Next sprinkle all of your spices over the chicken. Add the water and all of the canned ingredients evenly over the top of the chicken. Throw in the frozen corn and chopped bell pepper too. Layer the top with the ripped up tortillas, no stirring required. Cover and cook on high for about 4 hours. When the chicken has floated to the top and falls apart easily, break the chicken apart with a spoon and add your heavy whipping cream. Turn to low and let simmer for another hour or so.  Or you can cook it on low for 8 hours if you are going to make this while you are at work.

Serve this soup garnished with sour cream, shredded cheese, cilantro and maybe even some chopped avocado. Delicious! Enjoy!


EPIC FAIL

Dinner tonight (this was actually last week) was almost an epic failure. But, my wonderful husband Billy was generous enough to run to the store, probably out of desperate starvation, but non the less, he saved dinner.
It started out as a great idea. Pulled Pork in the CrockPot and Texas Roadhouse Rolls from scratch!!!
I found the Roadhouse Rolls recipe on Pinterest (I love Pinterest). The pulled pork luckily is just a no brainer.
 Pork, water, BBQ sauce, Worcestershire....
 The rolls however were a different story. I've never made them before but I've baked stuff and had it turn out pretty darn good. But between a building headache, and whining preschooler and cranky infant, I somehow managed to screw up the recipe. My dough didn't rise like it should have and the rolls turned out like rocks. :o/
 I was too devastated to photograph the aftermath of my little dough pucks.
The Pulled Pork turned out really good though.
So after a rush to the store and a purchase of some King's Hawaiian Rolls, dinner was pretty good.  I will probably try to make those rolls again but I am still feeling a little defeated so it may be a while. ;o)


Wednesday, November 7, 2012

Coming soon...

I'm currently working on a pair of faux leg warmers. I actually don't know what to call them but you wear them under your boots to make it look like you have awesome leg warmers or crocheted boot socks on.  I am making the pattern up as I go and if it turns out good I will post the pattern free here on my blog. Here is a sneak peek. :)
It's just the first row, the rest is a surprise.


Tuesday, November 6, 2012

Turning flared pants into skinny pants (Tutorial)

Ok...first off, I am no where near "skinny". I consider myself super-curvy with some pounds to spare. I keep them around for warmth and lack of motivation in the diet and exercise department. That being said, I am also pretty short. Like 5'1" short. Pants never fit me right and I find my dresser and closet clogged up with stuff I just don't wear. I have these corduroys by Gloria Vanderbilt that I have tried to throw out or donate several times and for some reason I always change my mind and put them back in my dresser. I've had them for years. They are too long, too baggy and not flattering. Well now that it is Fall, I want to wear boots and try to be semi-stylish. I decided I do not have enough cute boot type pants. So begins my adventure of turning my flared corduroys into skinny pants (for a chubby girl). I think they turned out great. They are updated and totally comfortable. Here is how I did it...
Start off with your baggy pants..

Told you, not flattering..

at all.

First thing you want to do it put the pants on inside out.  I didn't take pictures of this part but it's pretty self  explanatory.
Once you have them on inside out, starting at the crotch, you are going to grab the excess fabric and mark it off with a marker and pins. Working down the inner thigh all the way to the ankle. You don't really need to pin them at this point because you are going to re-pin them later. I however did pin them so I could feel how tight they were getting. If you do pin them, be really careful when you take them off or just remove the pins. The important part is the lines you make with the marker. They should look something like this.
See the blue line running down the inner leg?

Now, I used a ruler to connect all of my little dash marks and kind of straighten it ll out. I didn't even bother with the seam on the outer leg because I have never had good results trying to take those in.
After my line was all straightened out, I placed pins along it to keep the fabric in place so it wouldn't bunch up or go crazy! :)

Then, starting in the crotch area, I began a straight stitch along my lines. I reinforced the crotch area like crazy because I DO NOT want to be flashing my lady parts at anyone. :0)

 Once you have finished your initial straight stitch seam along both inner legs, you will want to turn the pants the RIGHT way and try them on again. This part is important because you want to make sure you like the fit before you remove the excess fabric. If parts are too tight you can take the seam out with your seam ripper and start over. I was quite pleased with my first seam. Once you are satisfied with the fit, turn the pants inside out again. Follow your original straight stitch with another row of stitches to make it extra strong.
 Once you have two rows of stitching, go ahead and cut away the excess fabric leaving about a 1/4" seam allowance.
 Looking Skinnier..
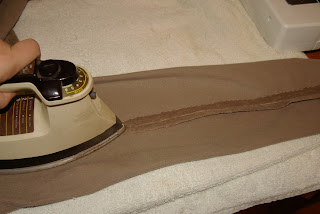
 Take your iron and press the seam allowance open and flat.
Turn the pants the right way and press the outside of your new seam flat as well.


Now you can hem up the bottom and cut away any excess fabric if you are really short like me! :o)
 Tada!!! Skinny pants on a super curvy girl!

This was SO easy. Took me about 30 minutes start to finish if you don't count all the times I had to stop to take care of my 11 month old busy boy. They are really comfy and now they are little more in style and they fit inside my boots. Yay!!! I have a few more pairs of outdated baggy pants and jeans that will be getting this same treatment.  I hope this works for you too. Enjoy!